

Sunny and Happy Garden
We have been happily been composting for our organic garden- which we love because it eliminates so much waste that otherwise would be lost in a landfill, and turns everything from coffee grinds, eggshells, and unwanted veggie leftovers into precious nourishment for the plants. After quite a bit of research we chose a tumbling composter, and liked it enough to purchase a second one. The yield on our fruit trees has increased considerably! For those curious, the products we use for composting are here
Steps:
STEP ONE: Buy a tumbling compost bin. The bin Nicole uses was sold at Amazon, but apparently (and sadly) the manufacturer makes them no longer, and they work great. They were D.F. Omer TC100 Backyard Gear Tumbling Composting Bin, 48-Gallon (Discontinued by Manufacturer)
by D.F. Omer. Here is what our bin looks like:

What our compost bins look like - what a shame they were discontinued!
After some research, it seems that two other bins much like Nicole’s bin are these:
Whatever bin you choose, you want it to have removable lids on both sides that don’t open by accident, and you want it to be a tumbling composter so you don’t need to heave through it with a shovel. Much easier/tideier to give the composter a spin than to plow through the muck with a shovel! What we like about this particular composter is that it has a 4-angle locking system – meaning that in between tumbles, you can pose the composter horizontal or vertical, so that it ‘cooks’ in the sun to the maximum. Both ends of this composter have lids that lock securely.
STEP TWO: Buy a small box of compost starter – you won’t need much – only a few cupfuls for the bin Nicole uses. Nicole recommends this compost starter: The compost starter such as the one that Nicole used. Once you’ve successfully made compost, you can use about four cups of that fresh compost as the starter for the next batch.
STEP THREE: Start thinking about your possible composting materials as either “brown material” or “green material”.
–BROWN MATERIAL: Woody stalks of plants, coffee filters, shredded black and white newspaper (avoid color paper because sometimes the color inks can be toxic), wood chips (if you get your trees trimmed, ask the tree trimmer to give you the wood chips from their chipper – plan ahead and have a spare garbage bin for it), old leaves (even pine needles in moderation), sawdust, hay, straw, even dryer lint (caution with dryer lint – I don’t use it because I’m worried about residue from the color dyes) . The word “brown” has nothing to do with color, it has to do with the carbon that will be released.
GREEN MATERIAL: Green grass clippings or freshly fallen leaves (still green), vegetarian table scraps like fruit rinds, leftover fruit, left over vegetables, old bread, even eggs shells (I wash off the egg shells), coffee grinds, tea leaves (can be in tea bag, remove staples), hair (yes, even dust bunnies from your dog!). The word “green” has nothing to do with color, it has to do with the nitrogen that will be released.
WHAT TO AVOID: Never add in any non-vegetarian table scraps like dairy products, meat, fish, bones, or any part of an egg (other than cleaned egg shells). Never add in any diseased or insect laden plants – you will only spread the problem when you spread the compost! Never add in things that are weedlike – like ivy, dandelions, quackgrass – that also will only increase your chances of spreading weeds! Never add in your dog or cat waste. Don’t add in anything treated with insecticides.
STEP FOUR: When you add materials to your composter, based on my experience, volume-wise you want to roughly add in TWO PARTS GREEN MATERIAL (i.e., coffee grinds, tea, kitchen scraps from fruits and veggie (even the rinds and peels), and grass clippings) TO EVERY ONE PART BROWN MATERIALS (i.e., coffee filter, old black and white newspaper, dead brown leaves, wood chips, woody stalks of plants). You will find all sorts of different ratios on the web – the reason they are different is that not all green material releases the same amount of nitrogen, so basing things volume-wise is a bit rough. The good news is, it is easy to experiment with up to four parts one to one part the other. Here’s how to tell if you have the right ratio for ‘sun cooking’ in your composter: If you open the lid and your compost smells rotten then you have too much green material and need to add brown material; if you open the lid and it seems nothing is happening (you don’t see any happy worms, for instance), and your mixture just isn’t making compost, then (assuming you’ve regularly been turning the composter and your composter is standing in the sun and your mixture isn’t dry), then that likely means you have too much brown materials and need to add in more green materials. The right ratio of compost actually smells sweet!
STEP FIVE: To start your composter composting:
1. Make sure you locate/position your composter in a full sun location. Position the composter in the sun BEFORE you fill it up (it will be too heavy to move easily once it’s full)!
2. Fill in the composter at least one quarter full with two parts green to one part brown materials, and then add a fat two cups of the compost starter, then add two fat cups of water, give your composter the first few spins. The most you want to fill your composter is 3/4 full.
3. Collect your green and brown materials every day and keep adding to the composter in roughly the two green to one brown ration, and spin the composter a few times every time you add new material. You can experiment with up to four green material to one brown material ratio, but any more green than that and your compost may start to smell foul. Compost at the right ratio smells sweet! If you do too much brown vs the green then your composter might fail to compost timely.
4. Regardless of whether you add new material, you should spin the composter every few days, and in around two-to-six months (depending on how hot your area is) from when you added your last material, you will have lovely compost! Spinning the composter provides the oxygen needed for the composting process and it also makes sure your cooks cooks evenly.
5. Once your compost looks like soil – you can’t distinguish any particular material in it, then you’ve successfully made your first batch of what I call ‘garden gold’ and you are ready to sprinkle your garden gold around your plants, and to start the composting process all over again.
IMPORTANT: Once your composter is 3/4 full, stop adding new materials, but keep spinning the composter and once every few weeks add a cup of water if it seems dry. If your composter is full but you don’t want to waste your table scraps in the meantime, that means you need to buy a second composter (that’s what I did), so you have your composters composting at alternate times.
Handy Hint: We keep a small bucket in our kitchen that came with its own lid, and use that bucket to store the compost material before we bring it to the main garden composter. In other words, that small covered bucket stays in our kitchen, and we fill it with whatever vegetarian scraps, waste, etc. we want to compost, then every other day carry the bucket into the garden, and dump the contents of the kitchen bucket into the garden composter. That’s a neat solution that’s handy and not messy or gross to look at! Here is a link to the sort of bucket that can work: Kitchen bucket for composting.

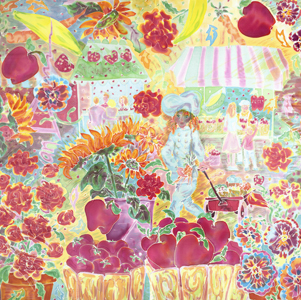
M. Nicole van Dam's painting of vegetables inspired by her vegetable garden.

Glorious Tomato Harvest

Finished Home Made Compost is black and FULL of worms - this is just one scoop of many!


Pingback: What Home Made Compost Looks Like When You’re Finished, and How to Use it! | | M. Nicole van Dam ®M. Nicole van Dam ®